Most days I end up eating Cheerios from a plastic bag at work for breakfast. Eating the same thing every day can get pretty boring and really makes me appreciate hot breakfasts even more. One of my favorite things to make is a Sausage and Cheese Breakfast Casserole. In addition to being really easy to whip up, you can make it the night before and refrigerate, so there's no need to get up extra early to prep!
When I heard we were having a "Breakfast with Oscar" party this past Sunday, I knew exactly what I was going to bring. This recipe came from my fabulous mother-in-law's arsenal of go-to breakfasts, but I'm not sure of its origins before that. Hope you enjoy!
Ingredients
6 slices of bread
1 pound sausage (I used Jimmy Dean)
6 eggs
1 can Carnation Evaporated Milk
Salt & Pepper
Shredded cheddar cheese (about 2.5 cups)
Large Pyrex dish
Directions
Cut slices of bread into cubes and cover the bottom of your Pyrex dish.
Brown and drain sausage, then sprinkle over the bread.
Mix eggs, evaporated milk, salt and pepper in a medium bowl. Then pour evenly over bread and sausage.
Then give the entire dish a generous sprinkle of cheese - I used about 2.5 cups.
Cover and refrigerate for at least one hour (or overnight). Bake at 375 F for 25-30 minutes, then let sit for 5 minutes before serving.
You can also make this weeks in advance and freeze (before cooking) for later! You're gonna love it!
Thursday, February 28, 2013
Tuesday, February 26, 2013
Our Crazy Oscar Party
I love the Oscars. Most years we've only seen a few of the films, but this year we'd seen about half of the "big ones" - Argo, Lincoln, Les Miserables, and Silver Linings Playbook. All of them were fantastic, so we decided we'd just be happy for whoever won. The one thing I was disappointed in was that Frankenweenie didn't win.
This year we went to our friend's Ann and Terence's house for an Oscar party. Ann loves to throw "theme parties", and our friend Jerin had been lobbying for a pajama party...so we figured why not dress down for one of the most dressed up nights of TV? Turns out Ann had asked both her husband and I on different occasions what we should eat...and both of us responded with a resounding BREAKFAST...so "Breakfast with Oscar" was born.
Here are a few shots from the evening.
The food was delicious! We had waffles with Nutella, bacon, a beautiful fruit salad, amazing gluten free scones, and a breakfast casserole that's out of this world (recipe coming later this week).
And of course the pups played. Toby came into the party wearing a Snuggie our friend Susan gave him a few years ago, but quickly wiggled out of it. He had to dress in PJ's too, right?
Fun night!
This year we went to our friend's Ann and Terence's house for an Oscar party. Ann loves to throw "theme parties", and our friend Jerin had been lobbying for a pajama party...so we figured why not dress down for one of the most dressed up nights of TV? Turns out Ann had asked both her husband and I on different occasions what we should eat...and both of us responded with a resounding BREAKFAST...so "Breakfast with Oscar" was born.
Here are a few shots from the evening.
The food was delicious! We had waffles with Nutella, bacon, a beautiful fruit salad, amazing gluten free scones, and a breakfast casserole that's out of this world (recipe coming later this week).
The scones were the BEST GF bread I'd ever had. Ann made them with Pamela's Baking & Pancake Mix. At $8/bag it's a little expensive, but was SO delicious! |
And of course the pups played. Toby came into the party wearing a Snuggie our friend Susan gave him a few years ago, but quickly wiggled out of it. He had to dress in PJ's too, right?
Toby, Amelia, and Sara (see her in the background?) |
Pete laid on the floor, which of COURSE was an invitation for the dogs to attack. |
Fun night!
Monday, February 25, 2013
Italian Chicken and Pasta
I love a good, quick, pasta recipe. Even better...one that uses leftovers from the night before.
One of my go-to "I want to sit on the couch while dinner cooks" recipes is Italian chicken. It's simple - marinate chicken breasts with Italian dressing in a plastic bag before you go to work in the morning. When you come home, pour the chicken and dressing into a Pyrex dish and bake for 40-45 minutes at 350 degrees.
I usually baked 4-6 breasts so we'll have leftovers throughout the week. One of my favorite things to do with this flavorful chicken is a quick pasta dish you're gonna love.
Ingredients
2 chicken breasts (with a little of the marinade)
3 small tomatoes
1/2 red onion
Olive oil
1/4 cup Parmesan cheese + more to top with
Garlic powder
Salt
1/2 box pasta (we went with thin spaghetti)
Directions
Prepare your ingredients! Cut chicken into bite-size pieces, dice red onion, and cut tomatoes into chunks. I like to remove the seeds from the tomato to keep them from watering down the sauce.
Saute red onion in 1 tablespoon olive oil and salt.
Once onions are translucent, add chicken and tomatoes. Cook over medium heat until the tomatoes have broken down, stirring frequently (about 15 minutes).
Cook and drain pasta. Add pasta, 1 tablespoon olive oil, 1/4 cup of Parmesan cheese, and a sprinkle of garlic powder to the pan and mix with sauce until combined.
Serve and top with a little more Parmesan cheese. So quick and easy! Nothing better than a delicious meal from leftovers!
Another thing I wanted to mention is a photography workshop I'm going to this weekend. If you're in the (greater) Boston area, check out Camera Ready Boston. It's a full day (10-5:30) of lots of information and fun with other novices and bloggers. Here's what we're going to learn.
By the end of the day you'll be able to comfortably shoot in manual mode and know all about aperture, ISO and shutter speed. You'll understand how best to shoot in low light, bright sun, and how to maximize and use available light most effectively when shooting. You'll learn the basic rules of framing shots, how to shoot still objects, people, and how to tell a story and shoot a process. You'll also learn basic editing tricks in Lightroom to really make your images shine. You'll get hands on practice and learn best practices for using your images on the web, in a blog, for your small business, or for your family albums.
At the end of the day, the professionals are even going to take portraits of everyone who attends. There are a few spots left, so act soon!
Friday, February 22, 2013
Sneaking Veggies into Dinner - Healthier Tacos
Everyone loves a quick and easy weeknight dinner. One of our simplest (and most fun) has become known as Taco Tuesday. Travis and I love tacos, but I've gotta tell ya...I don't love the idea of 75% of a meal being meat and shell. Sure you can add veggies to the top, but lettuce and tomatoes can only do so much. In an effort to remove some of the guilt from the meal, I add a secret ingredient that helps dilute the meat/carb factor (making them healthier)...and no one will ever know.
The secret ingredient - mushrooms!
You just need three things from the store:
1-1.5 pound package ground beef (90% lean)
8 ounces mushrooms
A "Taco Dinner Kit" (that contains the shells, seasoning, and sauce)
Directions
Finely dice the mushrooms so they are about the same size of a "crumble" of the cooked ground beef so they'll blend in nicely. I would think this one time a "slap-chop" would come in handy, but since I don't have one, I just chop away on a cutting board!
Brown and strain your ground beef. Return ground beef to the pan and add the mushrooms.
Then prepare as you would normally - add water and seasoning packet and simmer until combined. By the time it's done, you'll have to look pretty hard to tell the difference between the ground beef and mushrooms.
Such a sly way to sneak veggies into dinner - your family will be non the wiser. ;)
What are your favorite ways to make everyday dinners healthier?
Wednesday, February 20, 2013
Strawberry Banana Frozen Yogurt
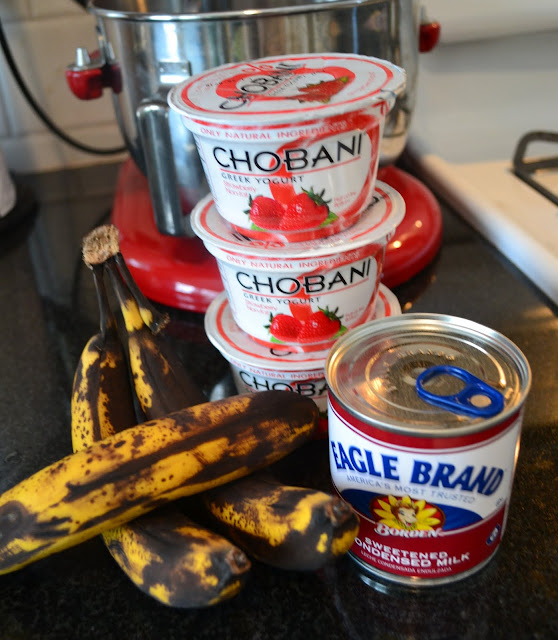
If you can't tell, I've been on an ice cream kick lately. Last week I was trying to use my bananas as quickly as possible, so I decided to try another variation of the Blackberry-Honey Frozen Yogurt - this time using Bananas and Strawberry Chobani - classic.
The best part about this (besides its thick and creamy texture) is that it only has three ingredients. No need to keep lots of items on hand to whip this up!
Ingredients
3 ripe bananas, mashed
3 6oz Strawberry Chobani yogurts
14oz Eagle Brand Sweetened Condensed Milk
Directions
Peel and smash bananas.
In a medium bowl, combine smashed bananas, Chobani, and Eagle Brand milk. Stir until mixture is smooth, cover, and refrigerate for 1-2 hours. The cold mixture will freeze better in your ice cream maker.
Once the mixture has chilled, pour into your ice cream maker and let it spin for 45 minutes to 1 hour according to the manufacturer's instructions.
So simple! Check out some of my other ice cream recipes!
Bananas Foster Ice Cream
Chocolate Ice Cream
Homemade Ice Cream Sandwiches
Blackberry Honey Frozen Yogurt
The best part about this (besides its thick and creamy texture) is that it only has three ingredients. No need to keep lots of items on hand to whip this up!
Ingredients
3 ripe bananas, mashed
3 6oz Strawberry Chobani yogurts
14oz Eagle Brand Sweetened Condensed Milk
Directions
Peel and smash bananas.
Once the mixture has chilled, pour into your ice cream maker and let it spin for 45 minutes to 1 hour according to the manufacturer's instructions.
So simple! Check out some of my other ice cream recipes!
Bananas Foster Ice Cream
Chocolate Ice Cream
Homemade Ice Cream Sandwiches
Blackberry Honey Frozen Yogurt
Monday, February 18, 2013
Pesto Chicken Panani
One of my favorite presents I received this Christmas as a Panini Maker. I love paninis and still remember when I had my first one. When husband and I had started dating, I went on a trip to NYC with his family and some of their family friends. It was my first trip to NY, so I spent most of the trip wide-eye'd and jaw dropped. One of the first days there, we stumbled upon one of the most crowded sandwich joints I've ever seen, and I decided to give one a try. It changed my sandwich-eating life forever!
We decided the first sandwich made on my magnificent panini press should be a pesto chicken panini. There's a sandwich shop down the street from my office that makes a fantastic version of this sandwich, which was my inspiration. Before we get into the how, check out my press.
My ma-in-law did an awesome job picking out my press. This baby is easy to clean AND easy to use. The shot above shows the panini plates. If you pop these out and turn them over, there is a flat griddle side to them that would make it easy to grill chicken or make pancakes. There's a lever you push that also allows you to lay the top down so it's converted into a longer griddle - perfect for pancakes and bacon in the morning. They also sell additional plates so you can make Belgian waffles, which I can't wait to try.
Now for what you need to make this fantastic sandwich.
Ingredients
Substantial bread (it needs to hold up with some pressing!)
Sliced tomato
Mozzarella Cheese (1.5 pieces per sandwich)
Chicken breast
Spinach
Olive oil
Onion powder
Salt & Pepper
Directions
Start by cooking your chicken breast. Since the point is to flatten and grill your sandwich, it will work best if your breast is pretty thin. You can flatten your chicken breast by placing it between two pieces of wax paper. Starting in the center, pound gently with a flat mallet until chicken is even in thickness. I seasoned mine with salt, pepper and onion powder and then cooked it in a frying pan with a little olive oil.
Once the chicken breast is cooked through, it's time to assemble your sandwich!
Once your panini press has preheated, place the sandwich(s) on the gridddle and close the lid. Press down on the handle for 30 seconds and then let cook for 5-6 minutes, or until the bread is golden brown and has those nice grill marks. Make sure to only touch the handle - I learned the hard way that the top can get pretty hot! :)
I wish I could get a second panini press and keep it at work - this really is the only way to eat a sandwich. :)
Subscribe to:
Posts (Atom)